Tag Archives: photoshop

Talyc in Captivity (SWTOR Fanfic Photoshop Experiments)

Talyc is one of the main characters the fanfic series. His face was actually created in Dragon Age Inquisition, which I then put armour from Star Wars The Old Republic to in Photoshop.

This image was fun to make. The lightning was simple enough, once you know how to do lightning in Photoshop. I needed to adjust the lighting in the SWTOR screenshot to fit the scene, as well as adjust the colours and lighting on Talyc himself.

Talyc Tortured by Relsor (Shadie series – Binky Ink – Celinka Serre)

Over here, I wanted to show the wide shot of the Dark Side Force stasis. I created the pillars in Photoshop from scratch, and used lightning to create the orbs of dark side energy, twelve layers for each. It was complicated to do, it just had a lot of layers to it. I had to have two backgrounds too to get the colours right for the more red half for it be more believable to fit with the background from the above picture, without making the bluer half too red. Thus a gradient did the trick.

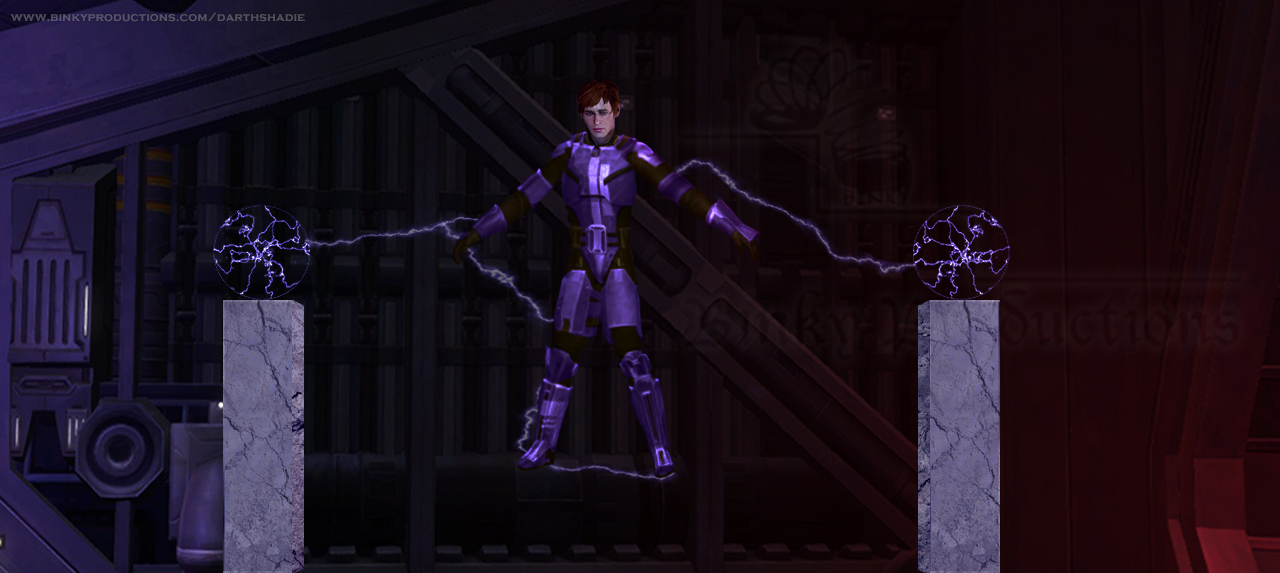
Talyc held in Dark Side Stasis (Shadie series – Binky Ink – Celinka Serre)

As always, I’m open to feedback.


These images were created for my Star Wars The Old Republic Fan-fiction story, Lady of the Crypt, story 5 in the Darth Shadie / Jedi Eidahs series.

View more Cosplay and Fanfic Photos from Lady of the Crypt

Read the Darth Shadie / Jedi Eidahs fanfic series.


Perhaps you’ll also enjoy Stardust Destinies I: Variate Facing; fantasy action-adventure taking place in a realm strong with magic where prophecies are dictated by dragons. https://binkyproductions.com/stardustdestinies


Sarcophagus in the Crypt (SWTOR Fanfic Photoshop Experiments)

In the story, there is a massive asteroid which still retains its own gravity that is known as the Crypt. It is where many Sith and Jedi, and many more secrets have been buried.

To get this image, I used a screenshot from SWTOR, adjusting the colour and lighting, and turning the floor into a more stone type of ground. The sarcophagus is also from SWTOR, whose cover I “closed” in Photoshop.

It is a simple image, representative of the story.

Crypt Sarcophagus (Shadie series – Binky Ink – Celinka Serre)

As always, I’m open to feedback.


These images were created for my Star Wars The Old Republic Fan-fiction story, Lady of the Crypt, story 5 in the Darth Shadie / Jedi Eidahs series.

View more Cosplay and Fanfic Photos from Lady of the Crypt

Read the Darth Shadie / Jedi Eidahs fanfic series.


Perhaps you’ll also enjoy Stardust Destinies I: Variate Facing; fantasy action-adventure taking place in a realm strong with magic where prophecies are dictated by dragons. https://binkyproductions.com/stardustdestinies


Fixing Old Family Photos in Photoshop!

I’ve been working on some old family photos, retouching them in Photoshop. One example is a large group photo from the late 1940’s.

This is the fixed up photo, in the way my client preferred.

Exemple Spots et Scratch enlevé avec Ajustement de Noir et Blanc de plus (Option 2)

Old Family Photo AFTER (Celinka Serre)

The original (below) shows multiple spots from old spills, other spots, a scratch, and it is somewhat faded as the photo itself is not in actual Black & White, but more of a Sepia print of the photo.

Exemple avec spots AVANT

Old Family Photo BEFORE (Celinka Serre)

When comparing the two, you can notice the various differences.

You will find more Before and After photos, as well as other types of Photoshop services I provide at the Photo Editing Services page.


Creating the Loch Ness Monster in Photoshop

I challenged myself to creating the Loch Ness Monster in Photoshop. I started with a fruit and veggie bowl, using Garlic Flower as my base for the monster. With a new background, a few filters, layers and adjustments, I created an old looking, typical grainy Loch Ness photo, as if on a foggy day.
#LochNessMonster #LochNess #Photoshop

This video showcases the steps I took, accompanied by music, to showcase my Photoshop experiment. It is not meant as tutorial video, but I do indicate what I used to create each layer and adjustment for those comfortable enough with Photoshop to be able to follow along and perhaps try it as well.

Image of the fruit and veggie bowl taken by Celinka Serre with Canon Powersho SX730 HS. Image of the water is royalty free from Pexels.

📗My High Fantasy Book: https://binkyproductions.com/stardustdestinies
📢 EXCLUSIVE Merch & Other Merch: https://teespring.com/stores/binkys-merch
🐲 Stardust Destinies Merchandise: https://teespring.com/stores/stardustdestinies

Short & Indie Films from Binky Productions:
▶️ Pathogen: https://youtu.be/xgCDWs3ZT38
▶️ Forward Fast: https://youtu.be/WgWnRyoCE6Q
▶️ Broken: https://youtu.be/7iQM8uo_LW8

My Other YouTube Channels:
🎮 Dragon Age content (DarthShadie Lavellan): http://youtube.com/DarthShadie
💚 Alternative & Natural Healing from Abuse (Green Healing): http://youtube.com/GreenHealing

✅ Where else to find me:
Follow me on Twitter: http://twitter.com/binkyprod
Subscribe to my Website where I post from all my channels, including fiction and fan-fiction: http://binkyproductions.com

💚 How to Support me:
PayPal Tip Jar:http://www.binkyproductions.com/howtocontribute
Patreon: http://www.patreon.com/BinkyProd
Amazon Wish List: https://www.amazon.ca/hz/wishlist/ls/14HC5WNPV3KV4?ref_=wl_share